
If you are using WordPress and want to improve your website’s SEO, Rank Math is one of the most powerful SEO plugins you can use in 2026.
But here’s the problem: Rank Math is no longer just a plugin for adding meta titles, descriptions, and focus keywords. Over the years, it has added a wide range of powerful SEO and AI features—and if you don’t configure them properly, you may not be getting the most out of it.
In this complete guide, I’ll show you how to set up Rank Math on your WordPress website from scratch and how to use its most important features to improve your SEO performance.
Rank Math has also introduced several new features that make it much more useful for modern SEO. For example, you can now use features like AI Link Genius and AI Visibility Tracker, and you can even connect your website with Claude to bring AI-powered capabilities into your SEO workflow.
However, many users install Rank Math but only use a small percentage of what it actually offers. They configure the basic settings and then never explore the features that could make their SEO workflow much easier.
That’s exactly what this tutorial is designed to solve.
So, let’s get started.
Step 1: Install Rank Math SEO Plugin
The first step is to install the Rank Math SEO plugin on your WordPress website.
To get started, log in to your WordPress dashboard and go to Plugins → Add New Plugin.
Here, you’ll see a search bar. Simply search for “Rank Math SEO.”
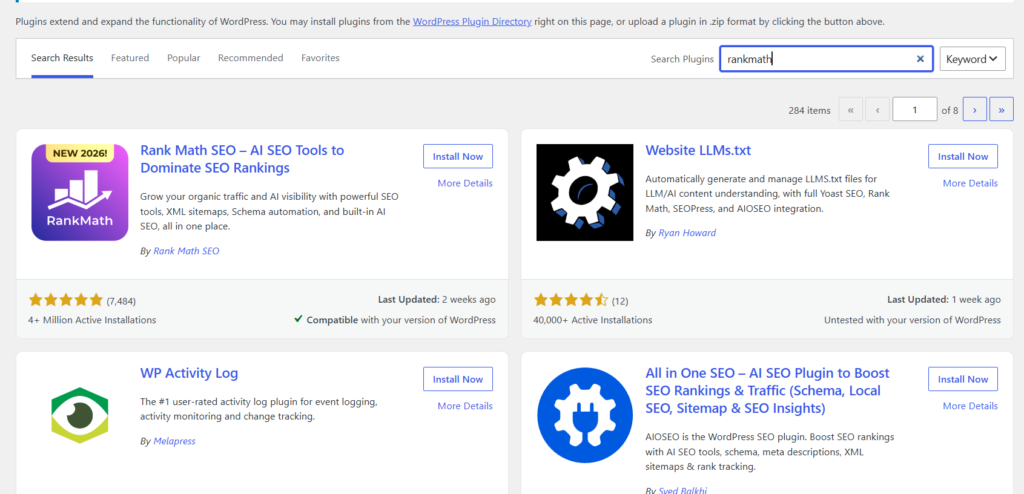
Once you find the official Rank Math SEO plugin, click Install Now and wait for the installation to complete.
After that, click Activate to enable Rank Math on your website.
Once the plugin is activated, Rank Math will be ready for the initial configuration, which we’ll set up in the next step.
Step 2: Choose the Setup Mode
As soon as you install and activate Rank Math, the Rank Math Setup Wizard will open on your screen.
Here, Rank Math gives you different setup modes to choose from. For this tutorial, we’ll select the Advanced mode.
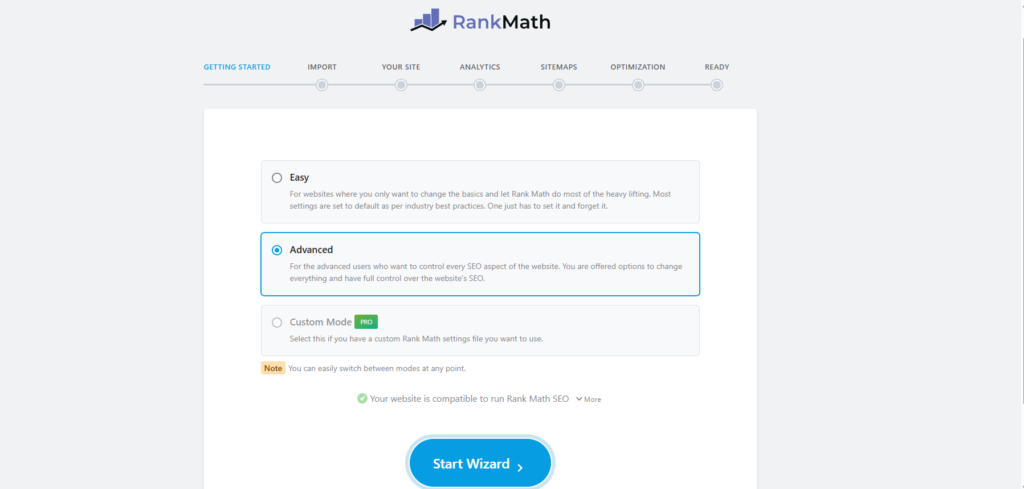
The Advanced mode is recommended if you want more control over your website’s SEO settings instead of relying only on the default configuration.
So, select Advanced and then click on Start Wizard to begin configuring Rank Math on your website.
Don’t worry if some of these settings look complicated—we’ll go through them step by step and configure the important options correctl
Step 3: Import Your Existing SEO Settings
In the next step, Rank Math gives you the option to import your existing SEO settings from another SEO plugin.
For example, if you were previously using plugins like Yoast SEO or another supported SEO plugin, you can import your existing settings and data into Rank Math instead of configuring everything from scratch.
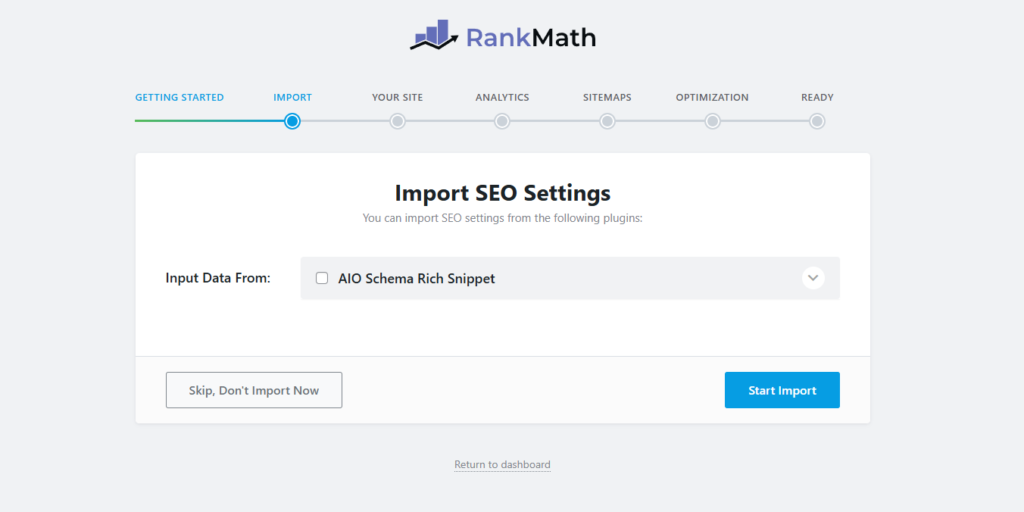
However, if you are installing Rank Math on a new website or you don’t have any SEO plugin data to import, you can simply skip this step.
In my case, I don’t have any existing SEO settings to import, so I’ll click “Skip, Don’t Import Now” and move to the next step.
Step 4: Add Your Website Information
Now Rank Math will ask you to provide some basic information about your website. This information helps Rank Math understand what type of website you have and how your site should be represented in search engines.
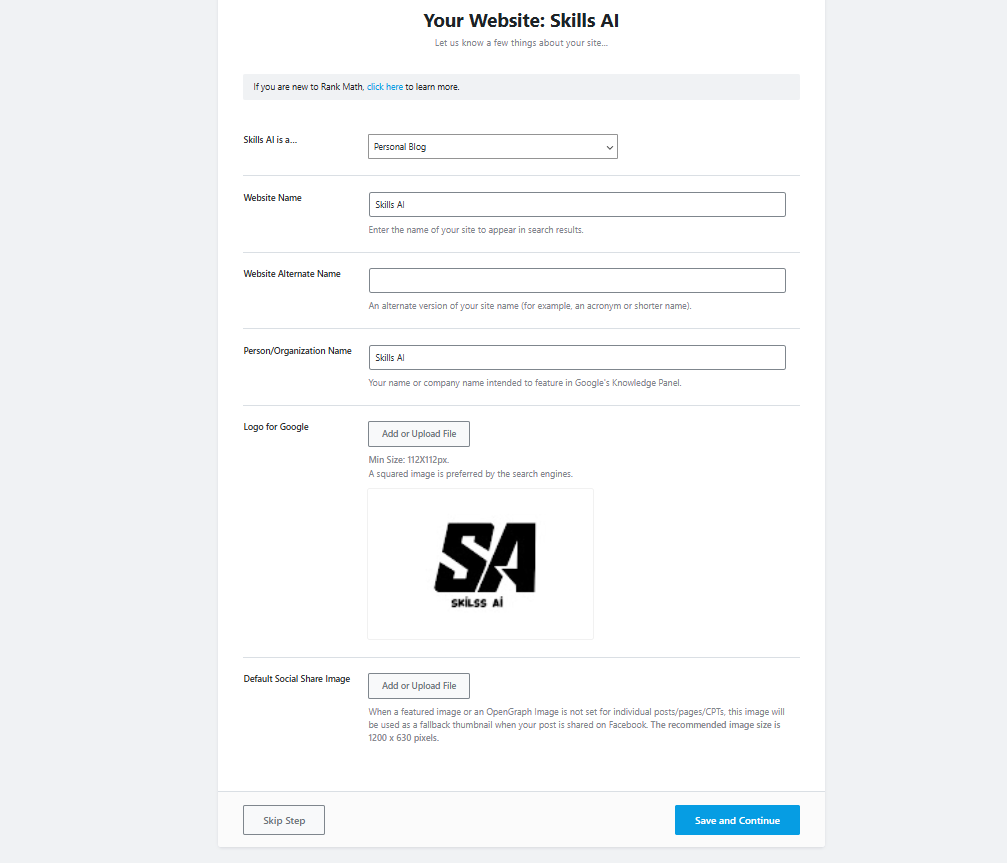
First, select the option that best describes your website. For example, you can choose Personal Blog, Community Blog, Business Site, News Site, Online Store, or another relevant option.
Next, enter your Website Name. This is the name that you want to appear in search results.
You can also add a Website Alternate Name, such as a shorter version or acronym of your website name. This field is optional.
After that, enter your Person/Organization Name. If your website represents a business or organization, enter the organization name. If it is a personal website, you can enter your name.
Rank Math also allows you to upload a Logo for Google. Upload your website or brand logo here. Rank Math recommends using a square logo, and the minimum size shown here is 112 × 112 pixels.
Finally, you can add a Default Social Share Image. This image can be used as a fallback when a post or page doesn’t have its own featured image or Open Graph image. A 1200 × 630 pixel image is recommended for social sharing.
Once you have filled in these details, click Save and Continue to move to the next step.
Step 5: Connect Your Google Services
In the next step, Rank Math gives you the option to connect your Rank Math account with Google services such as Google Search Console and Google Analytics.
To do this, click on “Connect Your Rank Math Account.”
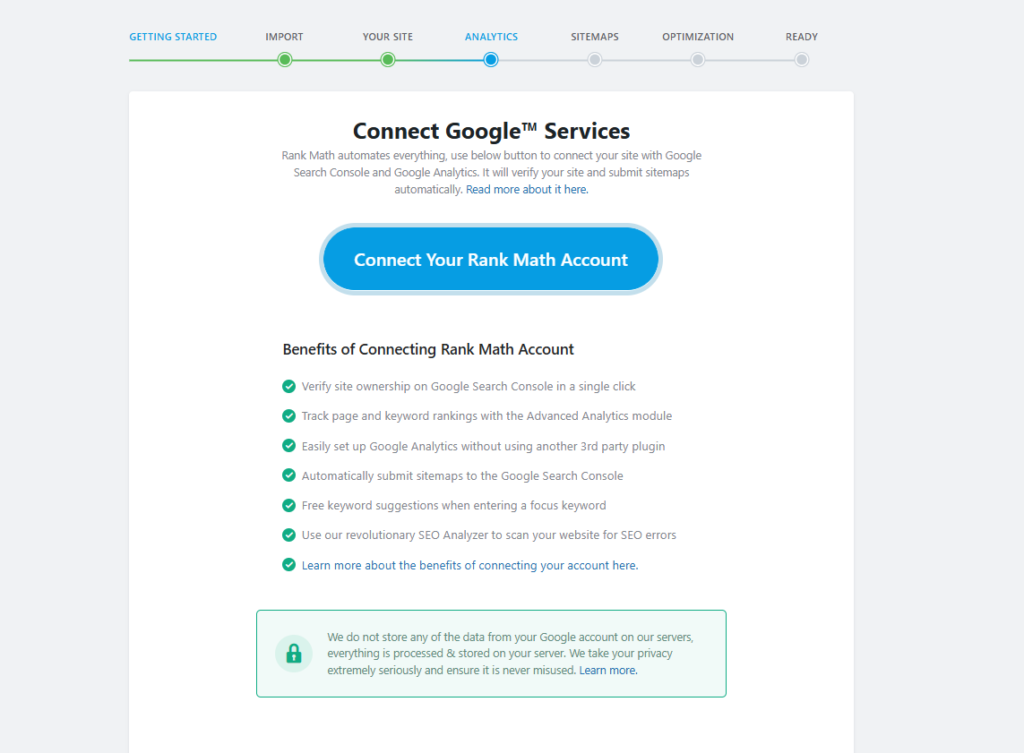
I recommend using the same Google account for Rank Math, Google Search Console, and Google Analytics, if possible. This makes the setup much simpler because you can manage everything through one Google account and easily select the correct Search Console property and Analytics account during the setup.
Once you connect your account, Rank Math can help you:
- Verify your website in Google Search Console
- Connect Google Analytics
- Track your keyword and page rankings
- Automatically submit your sitemap to Google Search Console
- Get keyword suggestions while optimizing your content
- Use Rank Math’s SEO Analyzer to identify SEO issues
So, click “Connect Your Rank Math Account” and follow the authorization steps to connect your Google services.
Note: If you already have Google Search Console and Google Analytics set up with a particular Google account, make sure you log in with that same account while connecting Rank Math.
Step 6: Select Your Google Services
After clicking “Connect Your Rank Math Account,” you’ll see this screen where Rank Math lets you select the Google services you want to connect.
If your Google Search Console and Google Analytics are already set up with the same Google account, you can simply select the correct website, Analytics account, property, and data stream from the dropdown menus.
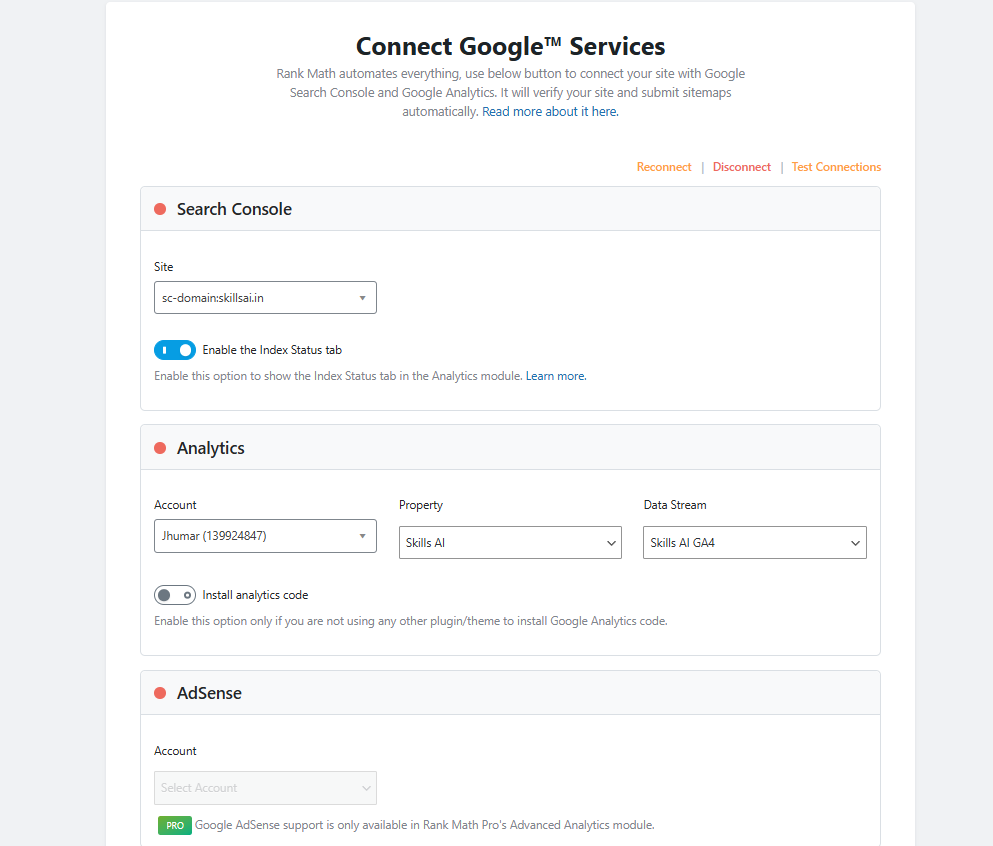
For Search Console, select the property that belongs to your website.
For Google Analytics, select the correct Account → Property → Data Stream associated with your website.
You’ll also see an “Install Analytics Code” option. Only enable this if you are not already using another plugin, theme, or method to add the Google Analytics tracking code to your website. If Analytics is already installed, leave this option disabled to avoid adding the tracking code twice.
Once you’ve selected the correct services and verified that everything is connected to the right website, continue with the setup.
Step 7: Configure Your Sitemap
In the next step, Rank Math will ask you to configure your website’s XML Sitemap.
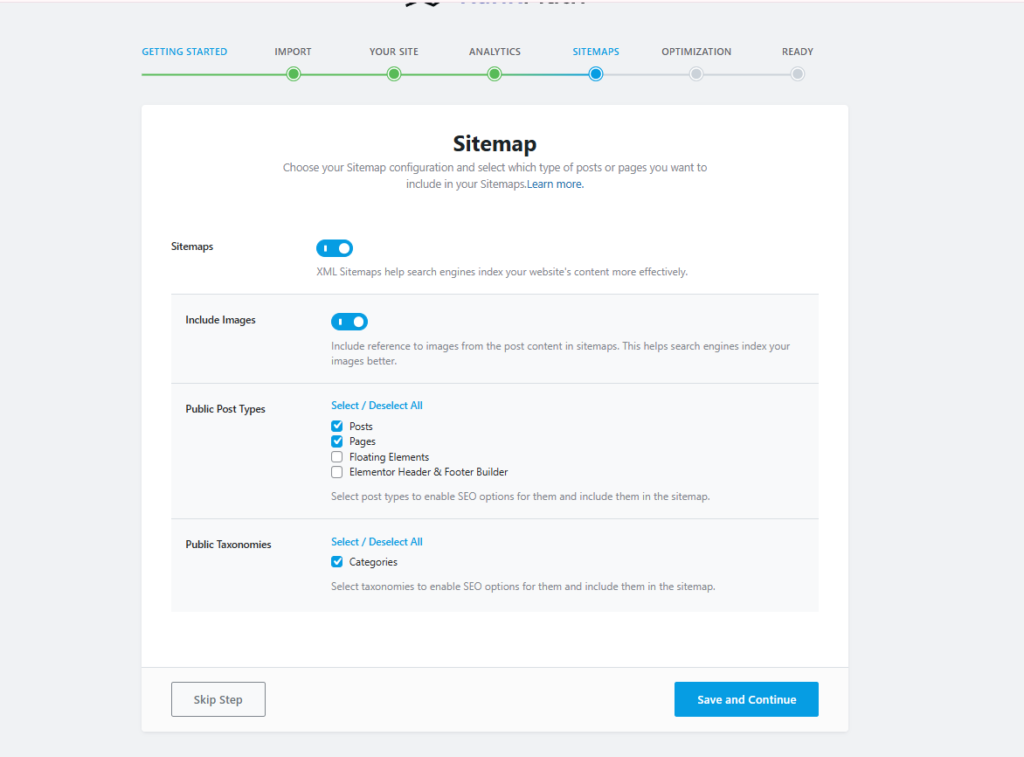
First, make sure the Sitemaps option is turned ON. If it is already enabled, you can leave it as it is.
An XML sitemap helps search engines discover and understand the important pages and content on your website, making it easier for them to crawl and index your site.
You’ll also see an Include Images option. I recommend keeping this enabled so that images included in your content can also be referenced in the sitemap.
Under Public Post Types, select the content types you want to include in your sitemap. For a typical blog, you can keep Posts and Pages enabled.
Similarly, under Public Taxonomies, you can keep Categories enabled if you use categories on your website.
Once these settings are configured, click Save and Continue to move to the next step.
Step 8: Configure SEO Tweaks
After configuring the sitemap, Rank Math will take you to the SEO Tweaks section. Here, you can automate a few useful SEO-related settings for your website.
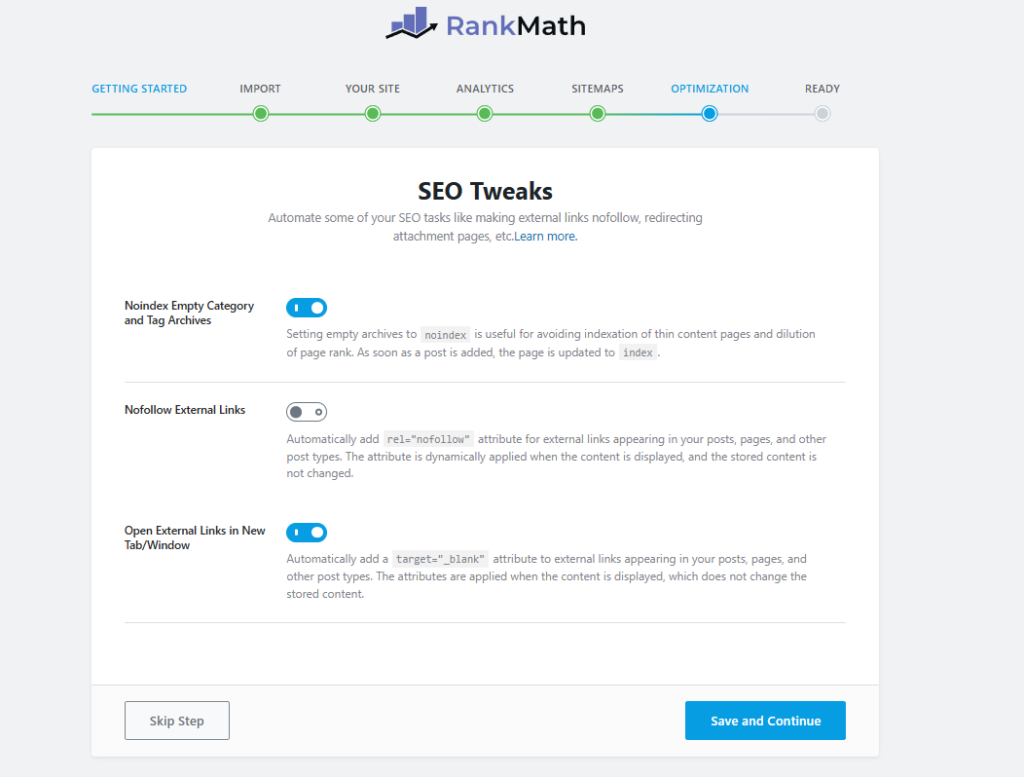
Noindex Empty Category and Tag Archives
Keep this option enabled.
This prevents empty category and tag archive pages from being indexed by search engines. Once you add content to a category or tag, Rank Math can automatically make that archive indexable again.
Nofollow External Links
You’ll also see the Nofollow External Links option. I recommend keeping this disabled.
You generally don’t want Rank Math to automatically add nofollow to every external link on your website. Instead, you should decide whether a particular external link should be nofollow based on its purpose and context.
Open External Links in New Tab/Window
I recommend keeping this option enabled.
With this setting enabled, external links from your content will open in a new browser tab, allowing visitors to access the external website without immediately leaving your website.
Once you’ve configured these settings, click Save and Continue.
Step 9: Complete the Basic Setup
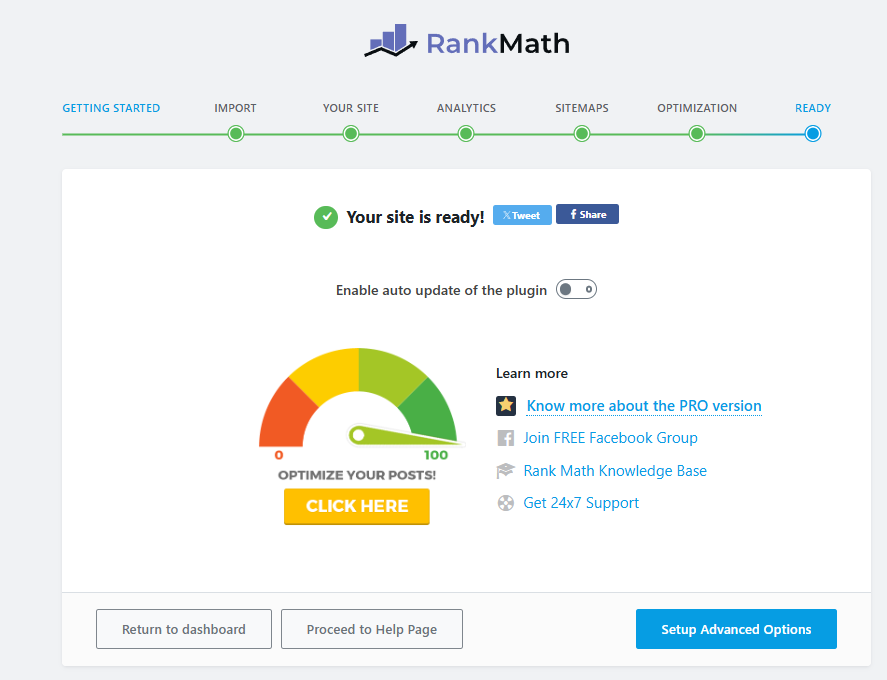
That’s it! The basic Rank Math setup is now complete.
However, we’re not done yet. Click on “Setup Advanced Options” to configure the remaining advanced SEO settings.
Step 10: Configure Role Manager
The first option in the Advanced Setup is Role Manager.
If your website has multiple users or different WordPress roles, you can enable this option to control who can access Rank Math’s settings.
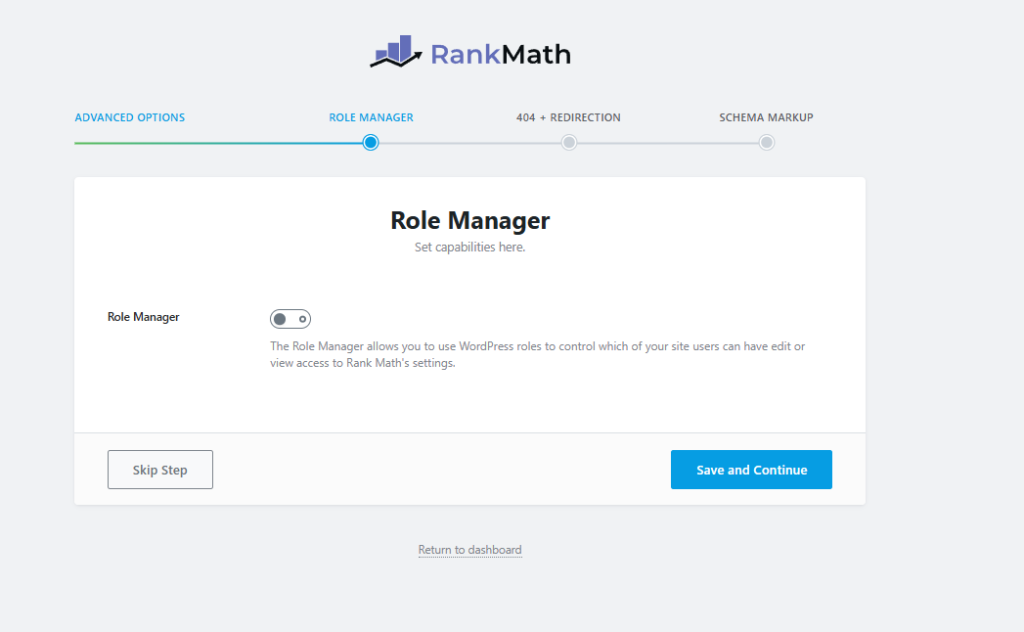
For a website managed by a single person, you can leave it disabled and click Save and Continue.
Step 11: Configure 404 Monitor and Redirections
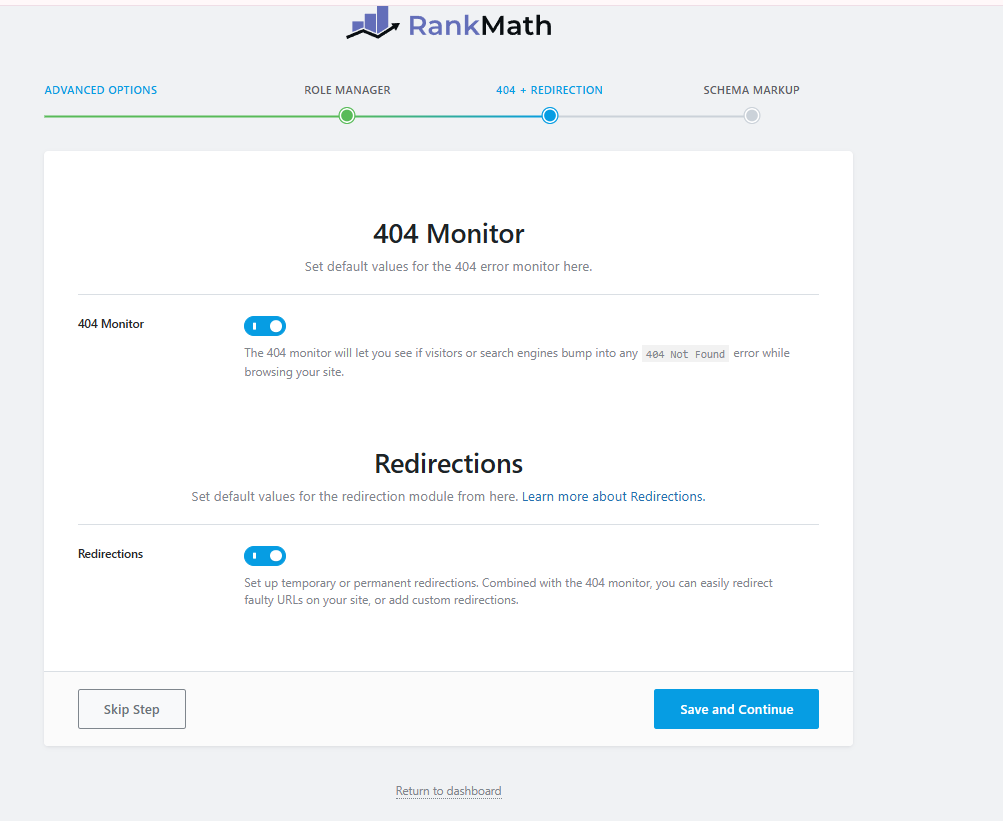
In the next step, Rank Math provides two useful features: 404 Monitor and Redirections.
404 Monitor
Keep the 404 Monitor option enabled. It helps you track when visitors or search engines try to access a URL on your website that no longer exists or cannot be found.
This is useful because broken URLs can create a poor user experience, and monitoring them allows you to identify pages that may need attention.
Redirections
Next, keep the Redirections option enabled as well.
This feature allows you to create 301, 302, and other types of redirects when you move, delete, or change the URL of a page. For example, if you change an old blog post URL, you can redirect the old URL to the new one instead of sending visitors to a 404 page.
Since both features are useful for managing your website’s URLs, I recommend keeping both options enabled.
Once you’re done, click Save and Continue.
Step 12: Configure Schema Markup
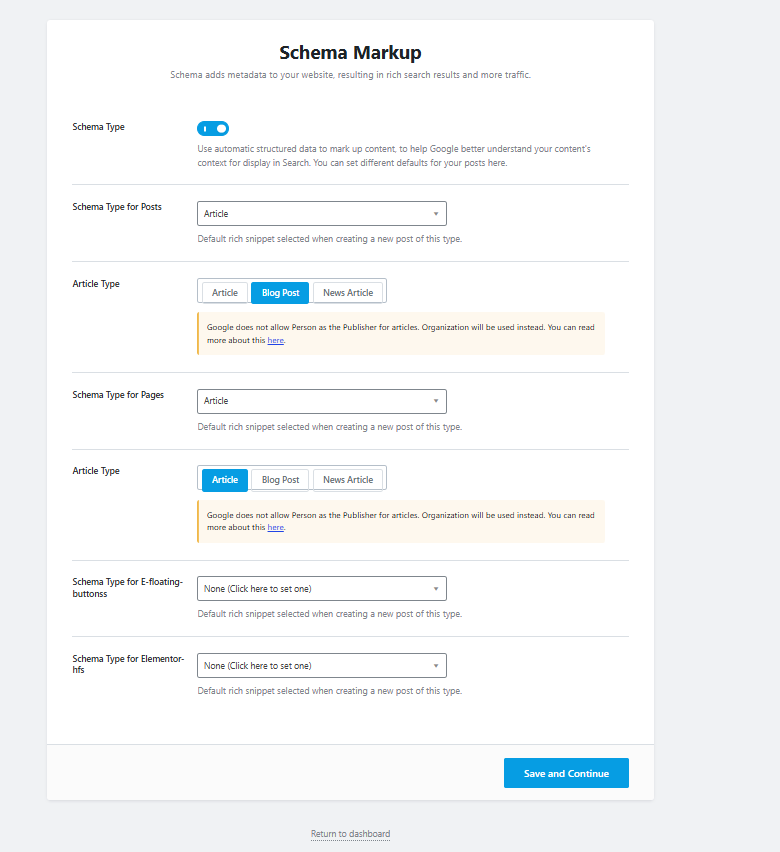
The final step in the Advanced Setup is Schema Markup. Schema helps search engines better understand the type and context of your content and can make your pages eligible for certain enhanced search features.
First, make sure Schema Type is enabled.
For Schema Type for Posts, you can select Article. Since this website mainly publishes blog content, select Blog Post as the Article Type.
For Schema Type for Pages, you can keep Article as the default if you plan to publish informational content on your pages. However, for normal static pages such as About Us, Contact, or Privacy Policy, you can later configure the appropriate schema individually when needed.
For Floating Buttons and Elementor Headers, you can leave the Schema Type as None if you don’t need schema markup for these elements.
Once you’ve configured these settings, click Save and Continue to complete the Advanced Setup.
Step 13: Rank Math Dashboard
Once you complete the setup, you’ll be redirected to the Rank Math dashboard.
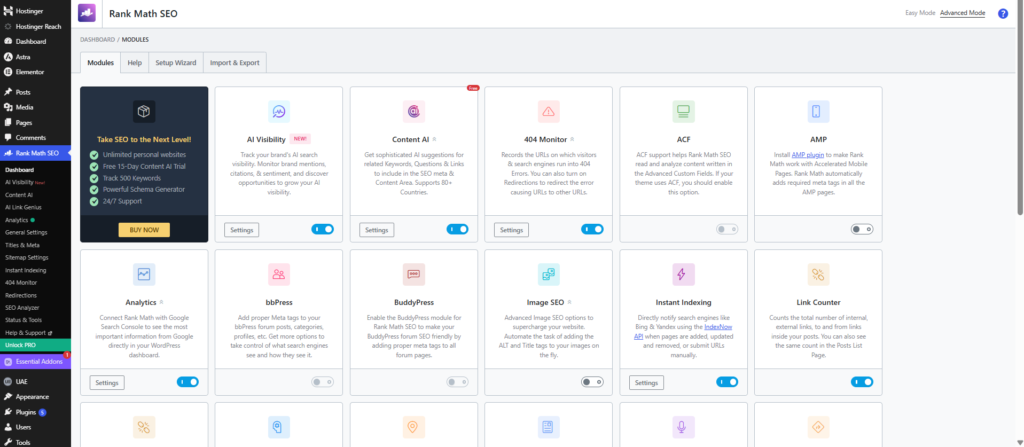
This is where you can access all the important Rank Math modules and SEO features. From here, you can enable or disable different modules and access features such as Analytics, Content AI, AI Visibility, 404 Monitor, Redirections, Image SEO, Instant Indexing, and more.
Your basic Rank Math setup is now complete.
Step 14: Optimize Your Blog Posts with Rank Math
Now that we’ve successfully completed the Rank Math setup, it’s time to see how you can actually use Rank Math to optimize your blog posts.
In the next section, I’ll show you how to use Rank Math while writing a blog post, including how to optimize your focus keyword, SEO title, meta description, content, headings, links, images, and other important SEO elements.
So, let’s see how you can use Rank Math to properly optimize a blog post and improve its chances of ranking in search engines.
Step 15: Check Your Rank Math SEO Score
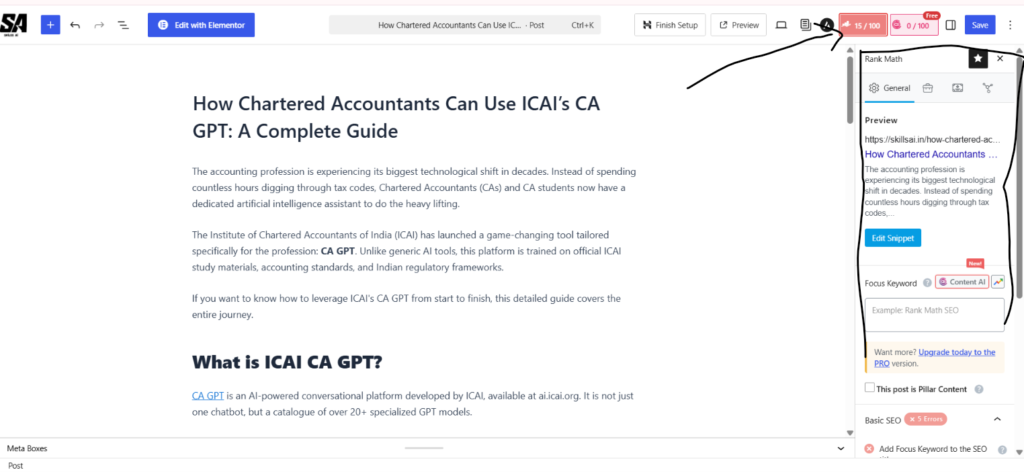
When you open your blog post in the WordPress editor, you’ll see an SEO score out of 100 at the top. This is the score provided by Rank Math.
To improve your blog’s SEO, your goal is to improve this score by following Rank Math’s recommendations.
As soon as you click on the score, the Rank Math sidebar will open on the right side of the editor.
We’ll use this sidebar to improve and optimize the blog step by step in the next section.
Step 16: Add Your Focus Keywords
The first thing you need to do is add your Focus Keyword in the Rank Math sidebar.
Your focus keyword tells Rank Math what your blog post is mainly about and which search terms you want to optimize it for. Rank Math then uses these keywords to analyze your content and provide SEO recommendations.
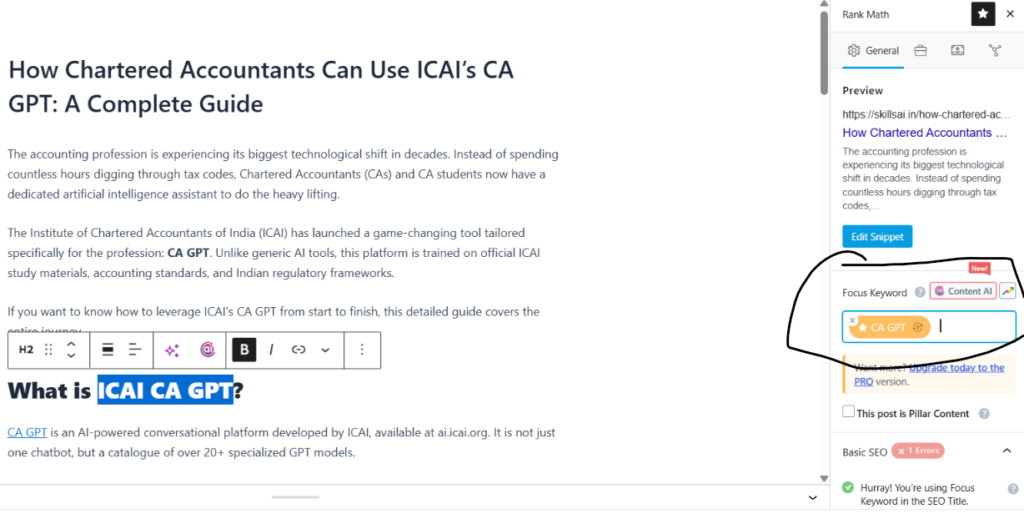
You can add up to five focus keywords to a single post. However, make sure you only add keywords that are genuinely relevant to your article.
For example, if your article is about ICAI CA GPT, you could add keywords such as “CA GPT,” “ICAI CA GPT,” or “CA GPT tutorial.”
Once you add your focus keywords, Rank Math will start analyzing your blog and show you recommendations for improving your SEO score.
Step 17: Optimize Your SEO Title, Permalink, and Meta Description
Next, we need to optimize the three important elements that appear in the search results: SEO Title, Permalink, and Meta Description.
To edit them, click on “Edit Snippet” in the Rank Math sidebar.
Here, you can manually optimize your:
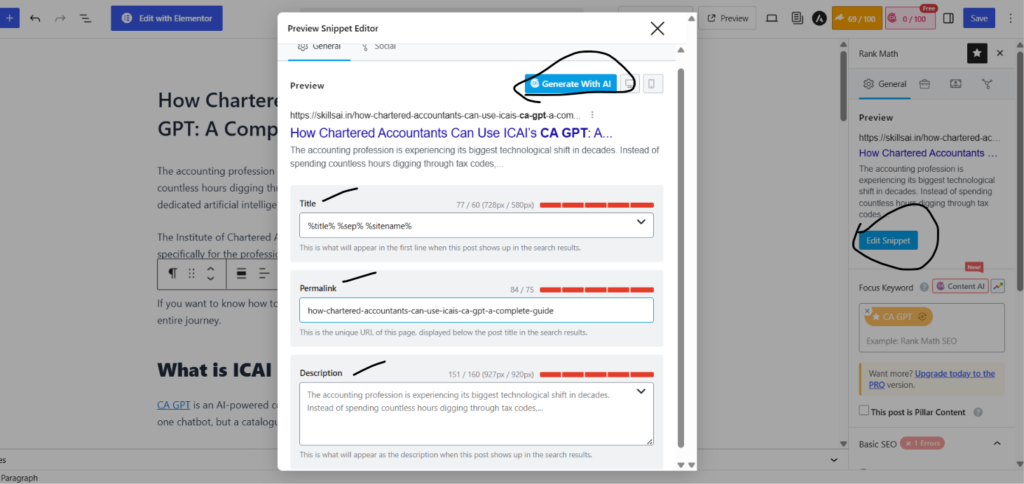
- SEO Title – Write a clear and compelling title that includes your primary focus keyword.
- Permalink – Keep your URL short, clean, and relevant to the topic. Avoid unnecessary words and characters.
- Meta Description – Write a concise description that explains what the page is about and encourages users to click.
Rank Math also provides a Generate With AI option that can help you generate and optimize these elements using AI. This feature is part of Content AI, and we’ll cover it in a separate, detailed tutorial.
For now, we’ll optimize the SEO title, permalink, and meta description manually so you understand exactly how to optimize each element yourself.
Step 18: Check the Basic SEO Section
After optimizing your SEO title, permalink, and meta description, Rank Math will show you a Basic SEO section in the sidebar.
This section checks whether your focus keyword has been used properly throughout the blog. For example, Rank Math checks whether the focus keyword appears in your SEO title, meta description, URL, the beginning of your content, and the main body of the article.
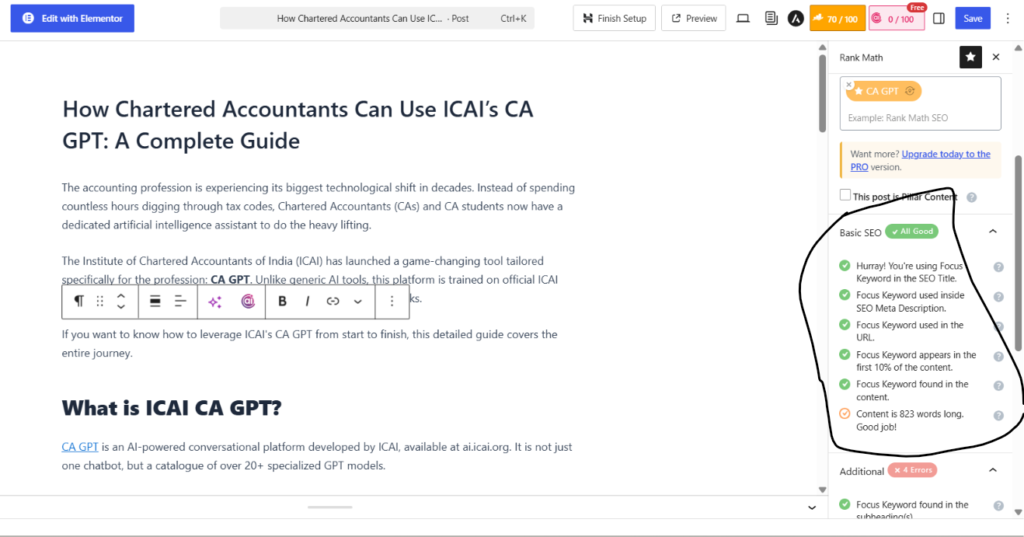
It also checks other basic SEO requirements, such as the length of your content.
You’ll see a green checkmark when a particular requirement is satisfied. If something needs improvement, Rank Math will show it as an error or warning, along with a suggestion for what you should fix.
The idea here is simple: go through these recommendations one by one and fix the issues that are relevant to your article. This will gradually improve your Rank Math SEO score.
Step 19: Check Additional SEO Recommendations
Below the Basic SEO section, Rank Math also provides Additional SEO recommendations.
Here, Rank Math checks a few more things, such as whether your focus keyword is used in subheadings and image alt text, your keyword density, URL length, and whether your content contains internal and external links.
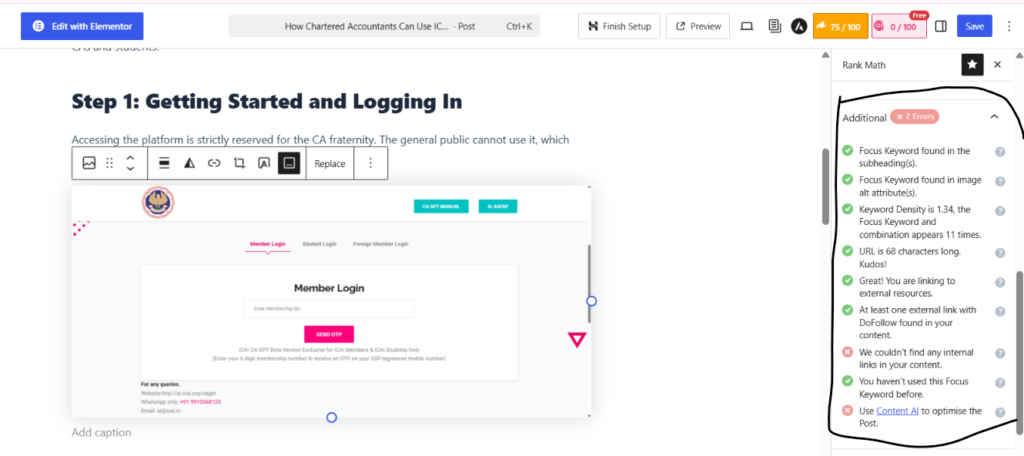
For example, in this case, Rank Math is showing that there are no internal links in the content. Adding relevant internal links to other pages or blog posts on your website can help users discover more content and also improve your site structure.
It also checks whether you have at least one DoFollow external link and whether the focus keyword has been used before.
You don’t necessarily need to make every recommendation green just to achieve a perfect score. Focus on making the content useful, natural, and well-optimized rather than adding keywords or links only to satisfy Rank Math.
Step 20: Improve Title and Content Readability
Rank Math also checks the readability of your SEO title and content to make sure your blog is easy for users to understand.
Under Title Readability, Rank Math may recommend things like placing your focus keyword near the beginning of the title, adding a positive or negative sentiment word, using a power word, or including a number.
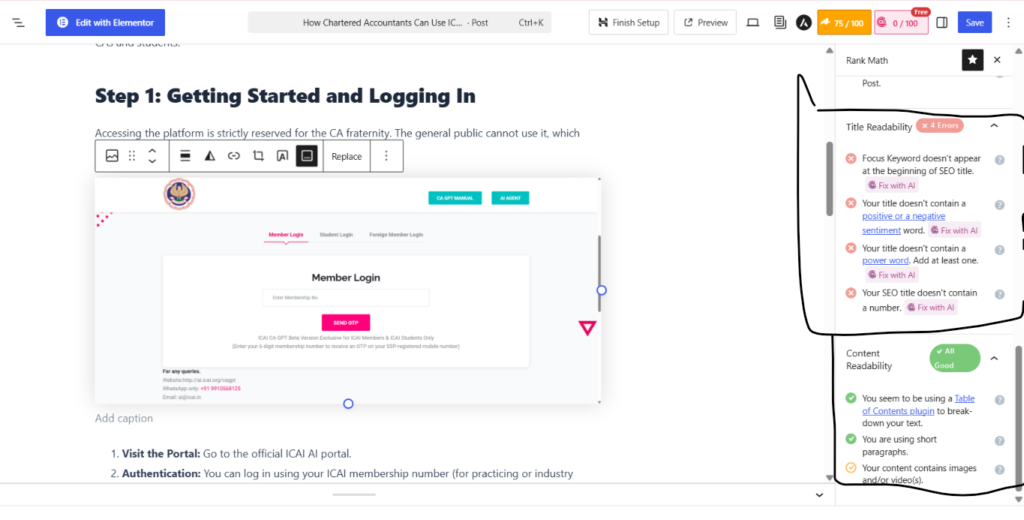
Below that, you’ll find Content Readability, where Rank Math checks things such as:
- Whether you’re using a Table of Contents
- Whether your paragraphs are short and easy to read
- Whether your content includes images or videos
- Whether your content is properly structured and easy to scan
If Rank Math finds an issue, it will show a recommendation that you can improve.
You may also see a “Fix with AI” option for certain recommendations. This allows you to use Rank Math’s built-in AI to help improve the title or content.
Again, you don’t need to blindly follow every recommendation just to get a 100/100 score. Focus on creating content that is genuinely useful and easy to read.
Step 21: Configure Advanced SEO Settings
Rank Math also provides an Advanced section where you can control how search engines should handle your individual post.
The first thing to check is the Robots Meta settings. For a normal blog post that you want to appear in Google and other search engines, make sure Index is selected.
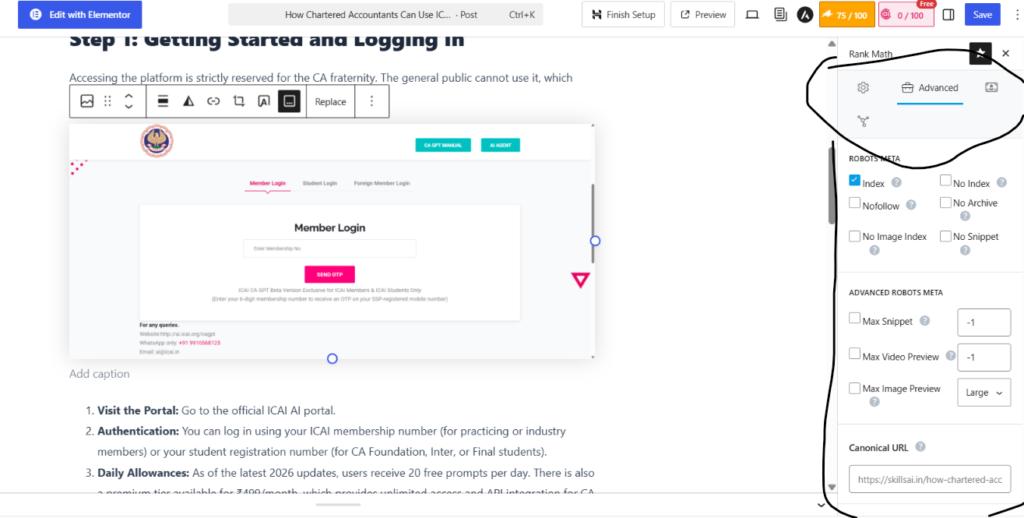
You should generally leave options such as No Index, No Follow, No Archive, No Image Index, and No Snippet unchecked unless you have a specific reason to use them.
You’ll also find Advanced Robots Meta settings, which allow you to control things like the maximum snippet length, video preview, and image preview. For a normal blog post, you can leave these at their default settings.
Finally, Rank Math provides a Canonical URL field. This tells search engines which URL should be treated as the primary version of the page. In most cases, you can leave the default canonical URL as it is.
So, for a regular blog post, the important thing is to make sure it is set to Index and avoid changing the other advanced settings unless you know why you need them.
Step 22: Configure Schema Markup
In the Schema section, you’ll see the schema that we configured earlier during the Rank Math setup.
For this blog post, Rank Math is already using the Article schema, so you don’t need to make any additional changes here.
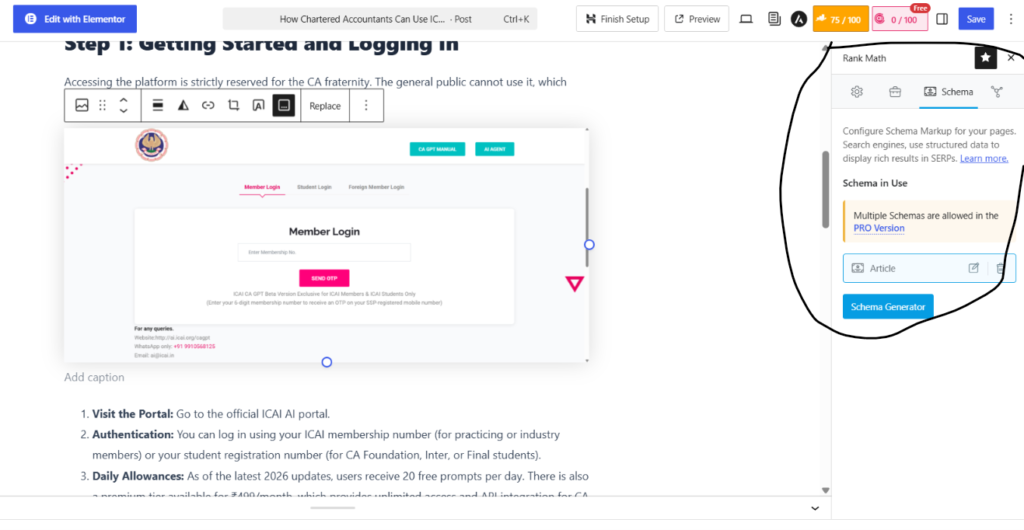
You can simply keep the existing Article schema and move on to the next optimization step.
Step 23: Final SEO Score and Conclusion
As you can see, by following the optimization recommendations we discussed, we improved the Rank Math SEO score from 0 to 80/100.
You can follow the same steps and recommendations to improve the SEO score of your own blog posts. However, remember that the goal isn’t simply to achieve a perfect score—the most important thing is to create useful, well-structured, and search-intent-focused content.
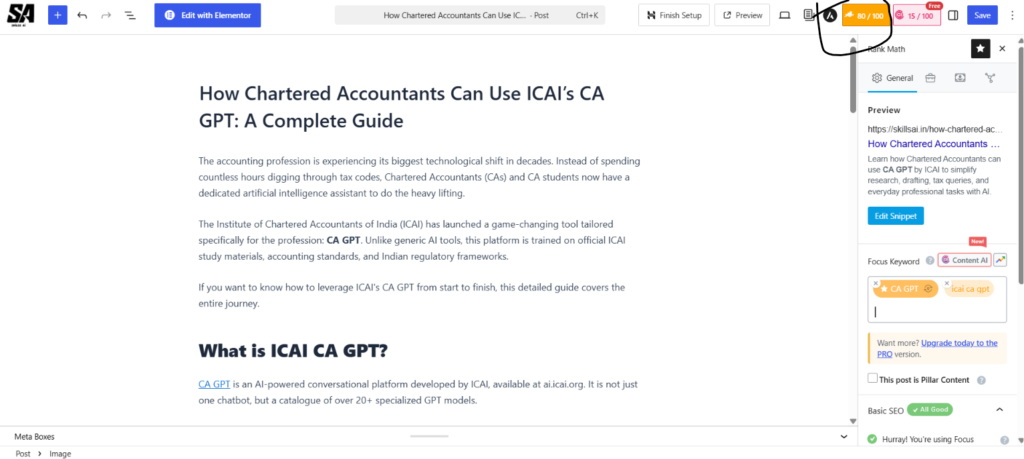
In this tutorial, we covered how to install and set up Rank Math on a WordPress website and then practically optimized a blog post using Rank Math’s SEO recommendations.
But Rank Math offers many more powerful features that we haven’t covered yet. In the upcoming tutorials, we’ll explore features like Content AI, AI Visibility, AI Link Genius, and more.
So, stay connected with our blog for the upcoming Rank Math tutorials.
Thanks for reading!