
Honestly, when I first heard about “AI Visibility,” I wasn’t sure what to make of it. I’ve spent years obsessing over Google rankings, keyword density, backlinks — the usual SEO grind. But lately I noticed something: a lot of my traffic questions were shifting. People weren’t just Googling things anymore. They were opening ChatGPT, Gemini, or Perplexity and asking those tools directly. And that got me thinking — if AI tools are answering questions instead of showing search results, is my brand even part of those answers?
That question is exactly what pushed me to try RankMath’s new AI Visibility feature. In this post, I’m going to walk you through exactly how I set it up and use it, step by step, so you can copy the same process for your own brand or website. No fluff, just what actually works.
What Is RankMath AI Visibility, Really?
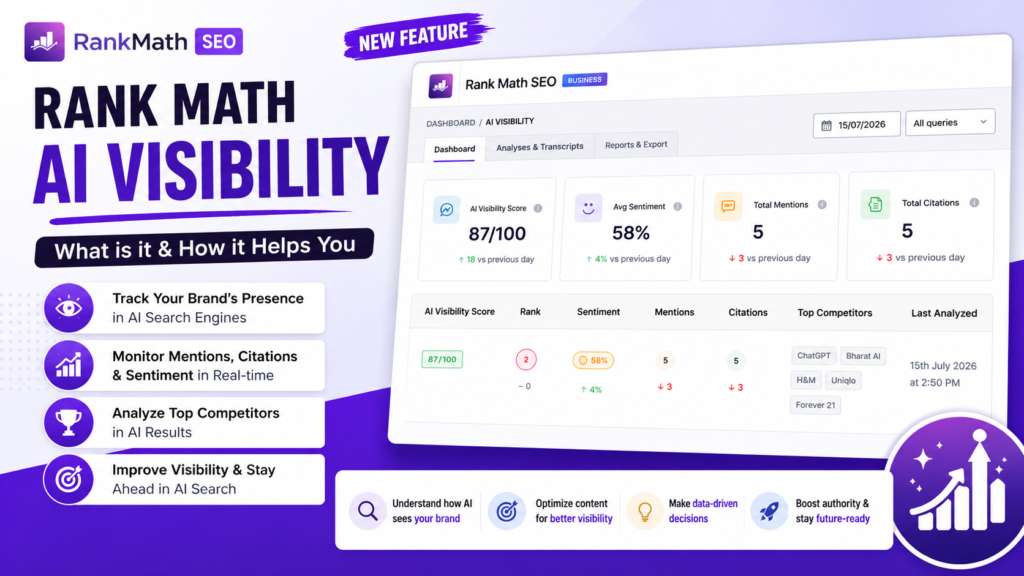
Before jumping into the steps, let me quickly explain what this feature actually does, because I think this context matters.
Traditional SEO tools (including RankMath’s own rank tracker) tell you where your pages sit in Google’s search results. That’s useful, but it only covers half the picture now. A huge chunk of searches today don’t end with someone clicking a blue link — they end with an AI tool giving a direct, summarized answer. And in that answer, AI doesn’t cite ten links. It picks a handful of brands to mention, compare, or recommend.
So the real question isn’t just “am I ranking on Google?” anymore. It’s “does AI even know I exist, and does it recommend me?”
That’s the gap RankMath AI Visibility fills. It tracks how often your brand, product, or service gets mentioned inside AI-generated answers across platforms like ChatGPT, Gemini, Claude, Perplexity, and Google AI Overviews. It also looks at things like:
- How often you’re mentioned (your “share of voice” in AI answers)
- The sentiment around those mentions (positive, neutral, or negative)
- Which sources AI is citing when it talks about you
- Who your competitors are in the eyes of AI, and how often they get picked over you
Basically, it’s rank tracking — but built for the AI search era instead of the traditional Google results page.
Before You Start: What You’ll Need
I’ll be upfront about this part because it saved me some confusion later:
- The RankMath plugin installed and active on your WordPress site.
- An active Content AI subscription. AI Visibility lives inside RankMath’s Content AI suite, so it isn’t part of the free plugin. You’ll need one of the paid Content AI plans to unlock it.
- A brand, product, or website you actually want to track (this can be your own business, or even a competitor if you want to keep an eye on them).
Once you’ve got those two things sorted, you’re ready to go.
Step-by-Step: How to Set Up RankMath AI Visibility
Here’s exactly how I did it, step by step. Follow along and you shouldn’t miss a thing.
Step 1: Enable the AI Visibility Module
First, log in to your WordPress dashboard and head over to:
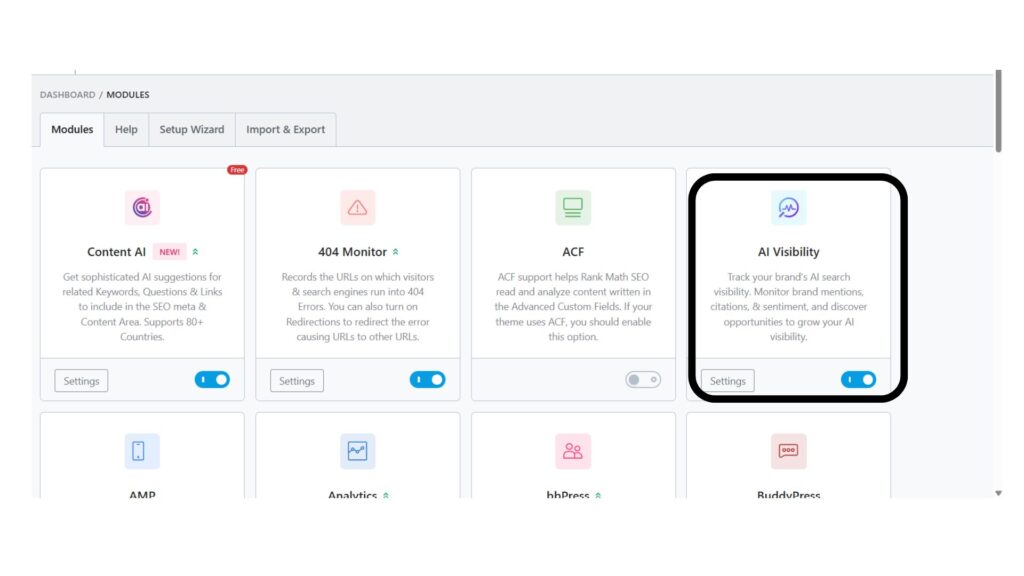
Rank Math SEO → Dashboard
Click on the Modules tab. Scroll down (or search) until you find the AI Visibility module. By default, it’s usually turned off, so you’ll need to toggle it ON yourself.
This step is easy to skip past without noticing, so double-check it’s actually enabled before moving forward. If it’s off, none of the next steps will show up properly in your dashboard.
Step 2: Open the AI Visibility Dashboard
Once the module is switched on, a new menu item will appear in your sidebar. Go to:
Rank Math SEO → AI Visibility
If this is your first time here, you’ll see a prompt to add your first brand. Click on Add Your First Brand.
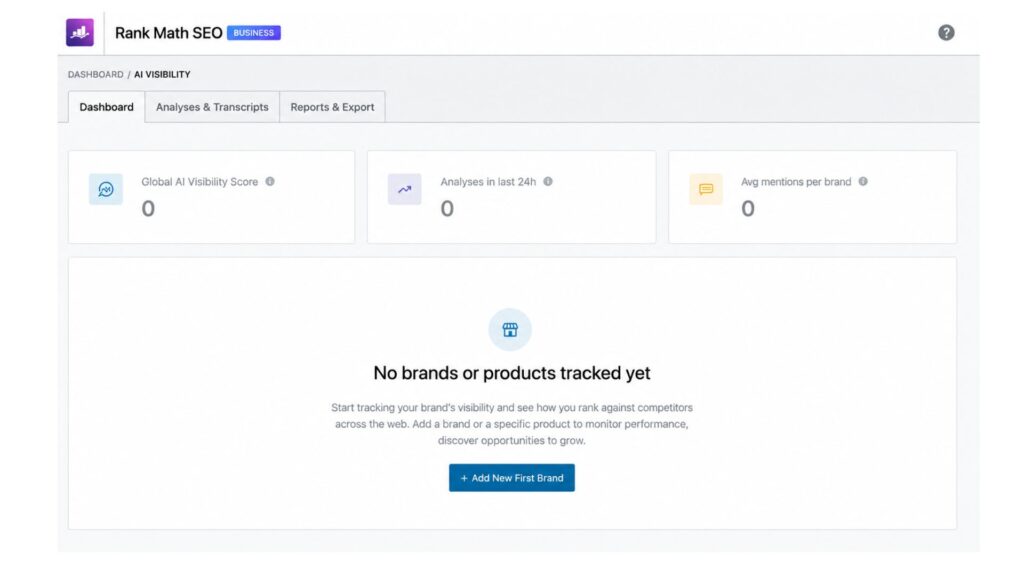
If you’ve already added brands or products before and just want to add another one, click the Add Brand/Product button instead — same result, just a slightly different starting point depending on where you are.
Step 3: Fill in Your Brand or Product Details
This step matters more than people think, so take your time here. RankMath will ask you for the following:
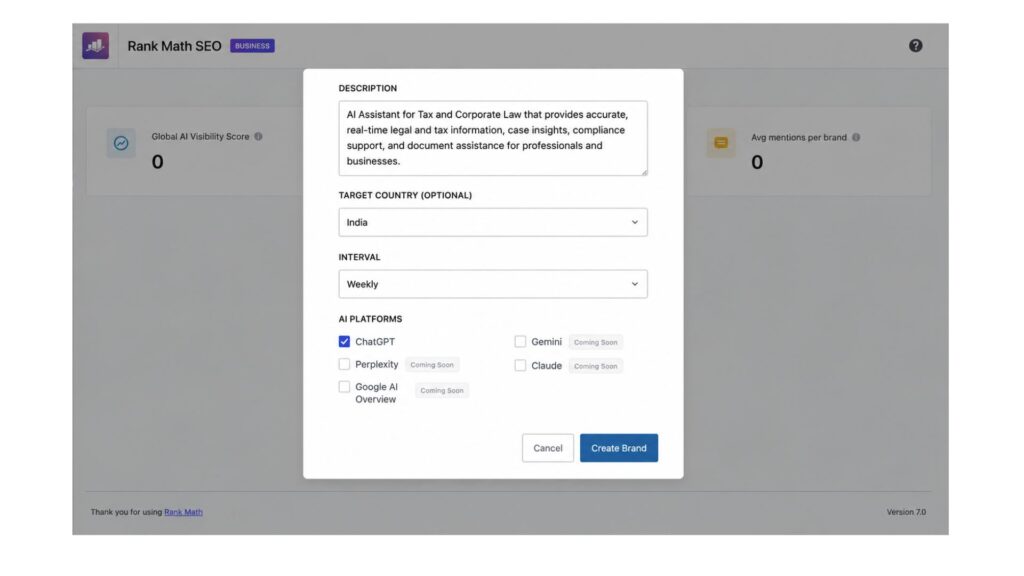
- Brand/Product Name — Type it exactly the way it appears online. Don’t shorten it or change the spelling; consistency here helps the AI models recognize it correctly.
- Brand/Product URL — The main website or page for the brand/product you’re tracking.
- Description — This is the most important field, in my opinion. Write a clear, detailed description of what your brand or product actually does, who it’s for, and what makes it different from competitors. The more specific and detailed you are, the better RankMath’s AI model can correctly identify your brand and separate it from similarly named brands or products.
- Target Country (optional) — Pick the country you care about most if your audience is location-specific. You can leave this blank if you’re targeting a global audience.
- Interval — Choose how often you want RankMath to refresh your tracking data (for example, daily or weekly, depending on the options available).
- AI Platforms — Select which AI platforms you want to monitor: ChatGPT, Gemini, Claude, Perplexity, Google AI Overviews, and so on.
A quick tip from my own experience: don’t rush the description field. A vague, one-line description gives the AI model less to work with, and your tracking accuracy will suffer for it. Write it the way you’d explain your business to a stranger who’s never heard of it.
Once everything’s filled in, click Create Brand, and RankMath will start tracking mentions of your brand across the platforms you selected.
Step 4: Give It Time to Collect Data
This part requires a little patience. AI Visibility needs to actually run queries and monitor AI-generated answers before it can show you meaningful data, so don’t expect instant results the second you hit create. Depending on your chosen interval, give it some time before checking back.
Step 5: Open Your Report and Explore the Tabs
Once data starts coming in, go back to:
Rank Math SEO → AI Visibility
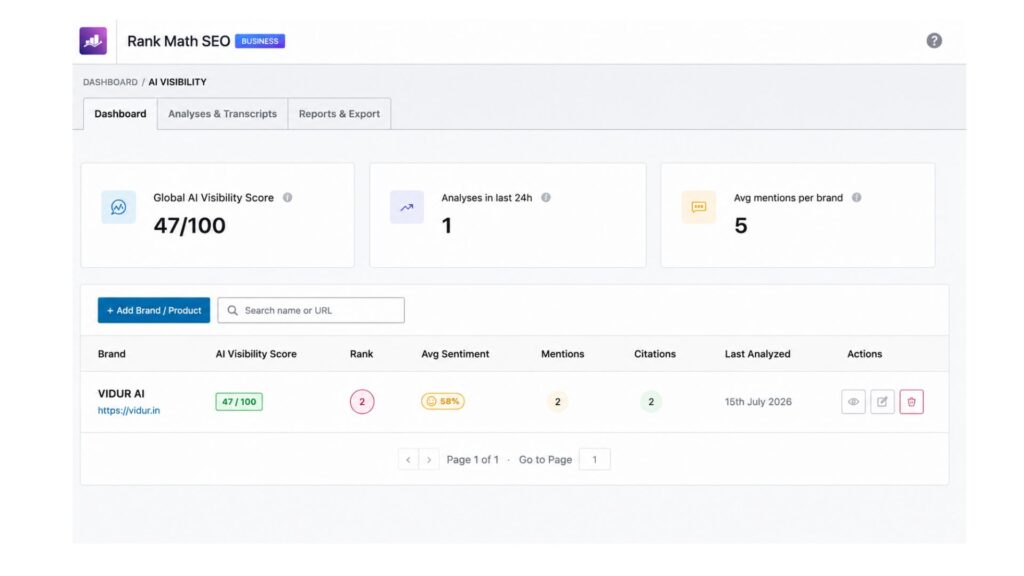
You’ll see a list of all the brands/products you’re tracking. Find the one you want to check and click the View icon next to it. This opens up your full report, split across four tabs. Here’s what each one tells you:
a) Overview Tab
This is your bird’s-eye view. It shows:
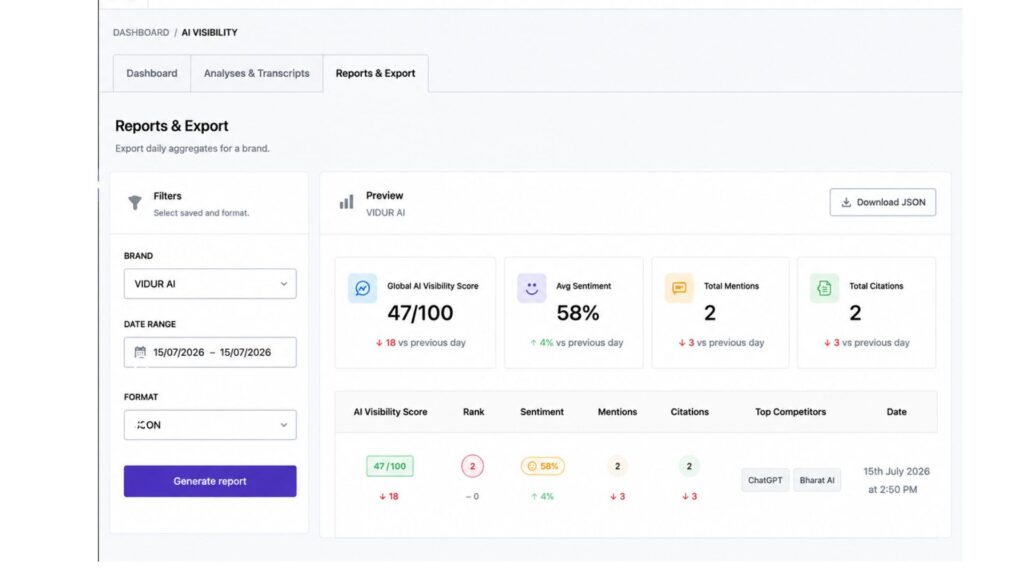
- AI Visibility Score — a single number that reflects your overall presence, calculated from your rank, citations, mentions, and sentiment combined.
- Recent Mentions — the latest times your brand showed up in an AI answer.
- Average Sentiment — whether AI tools are generally talking about you positively, neutrally, or negatively.
- Top Competitor — the brand or product AI most often compares against yours.
I check this tab first every time, since it gives me a quick pulse-check before I dig deeper.
b) Queries Tab
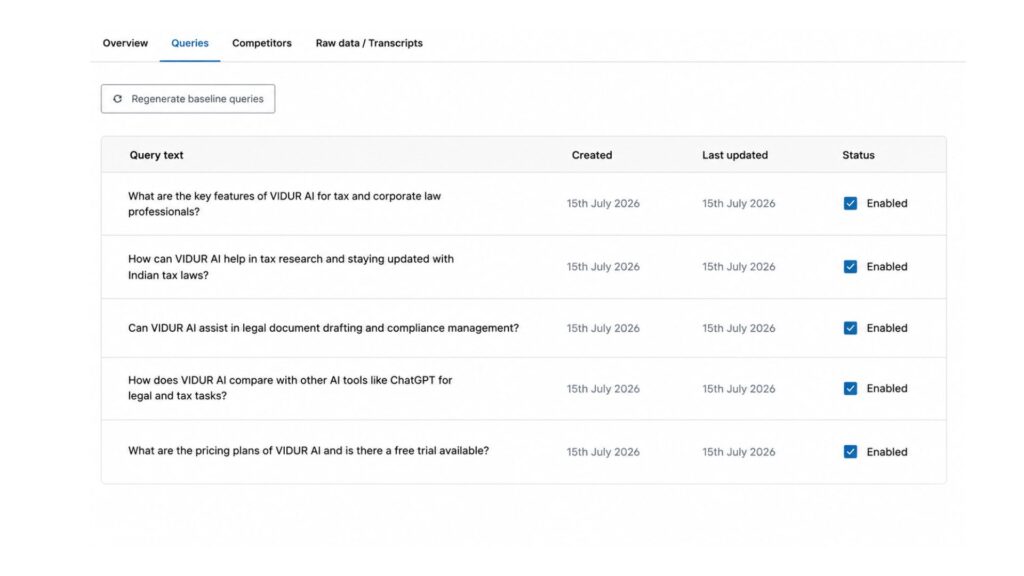
This tab shows you the actual prompts, questions, or search queries that triggered a mention of your brand in an AI response. This is genuinely useful, because it tells you what people are actually asking AI tools when your brand comes up — which can shape your content strategy going forward.
c) Competitors Tab
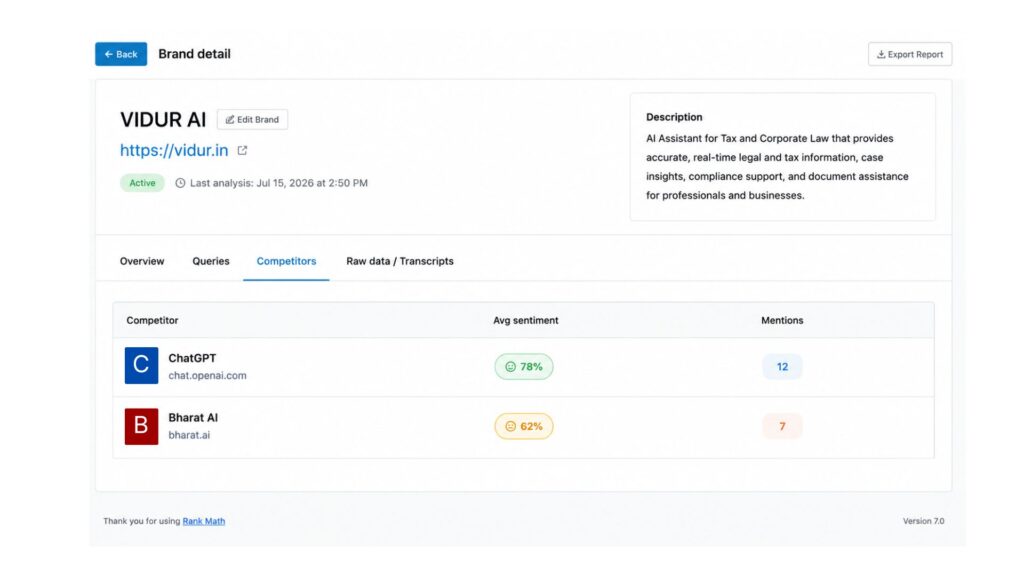
Here you’ll see your top competitors, how often they’re mentioned, and their average sentiment scores. These are typically the brands AI mentions alongside you, or sometimes instead of you, when answering similar questions. If a competitor keeps outranking you here, that’s a clear signal about where you need to strengthen your content or authority.
d) Raw Data / Transcripts Tab
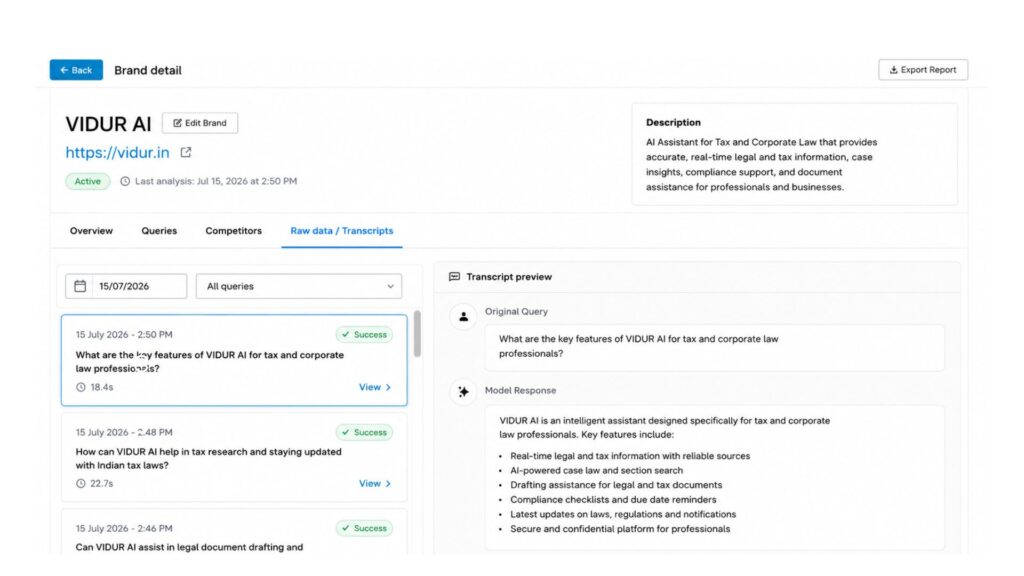
This is where you can see the full transcripts — the actual AI-generated answers where your brand appeared, along with the exact query that led to it. I find this tab useful when I want to understand not just that I was mentioned, but how I was described, and whether the information AI shared about me was accurate.
What I Do After Reviewing My Report
Checking the dashboard is only half the job. Here’s how I actually use the data:
- If my sentiment score is low, I look at the Raw Data tab to understand exactly what’s being said, and I update my website content to clarify anything AI might be misrepresenting.
- If a competitor keeps showing up more than me in the Competitors tab, I study what kind of content or authority signals they have that I might be missing.
- If the Queries tab shows recurring questions I’m not directly answering on my site, I create new content specifically targeting those questions, since that’s clearly what people (and AI) are looking for.
Basically, I treat AI Visibility the same way I treat keyword rank tracking — not just as a dashboard to glance at, but as a to-do list for my content strategy.
Why This Matters for SEO Going Forward
I’ll be honest, I used to think AI-generated answers were a threat to SEO, something stealing my traffic. And in some ways, that’s still true. But the way I see it now, AI Visibility isn’t optional anymore — it’s becoming a whole new discovery channel, separate from classic search rankings.
If your brand isn’t showing up when AI tools answer questions in your niche, you’re invisible to a growing chunk of your audience, even if you’re ranking #1 on Google. That’s exactly why I started treating AI Visibility as a core part of my SEO routine instead of a side experiment.
Final Thoughts
Setting up RankMath’s AI Visibility feature genuinely took me less than ten minutes, and the insights it gave me were eye-opening almost immediately. If you’re already using RankMath and have access to Content AI, I’d honestly recommend giving this a proper try rather than ignoring it as just another dashboard.
To recap the steps quickly:
- Enable the AI Visibility module from Rank Math SEO → Dashboard → Modules.
- Go to Rank Math SEO → AI Visibility and add your brand or product.
- Fill in accurate, detailed brand details, especially the description.
- Let RankMath collect data based on your chosen interval.
- Review your report across the Overview, Queries, Competitors, and Raw Data tabs.
- Use those insights to actually improve your content and close visibility gaps.
If AI is going to keep shaping how people find brands, I’d rather know exactly where I stand than find out too late that I was never part of the conversation at all.